

Hyper-V Backup Quick Start Guide
This “How-to” guide provides a short walkthrough of all the steps required to set up a successful Hyper-V backup.
Prerequisites
In order to create a VHDX backup, you need to first download and install the 64-bit version of BackupChain, which also installs on Hyper-V and Windows Core Servers via the command line, see notes on download page.
Task Configuration
While there are plenty of options to fine-tune your backups, we’ll only go through the steps absolute necessary to complete a successful disaster recovery in this article.
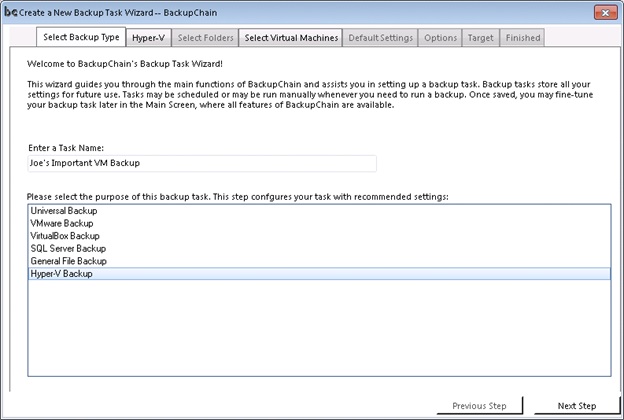
Step #1: Select Task Type
The first step is to select the task type correctly as shown below. Note that you get the same GUI even on core servers:
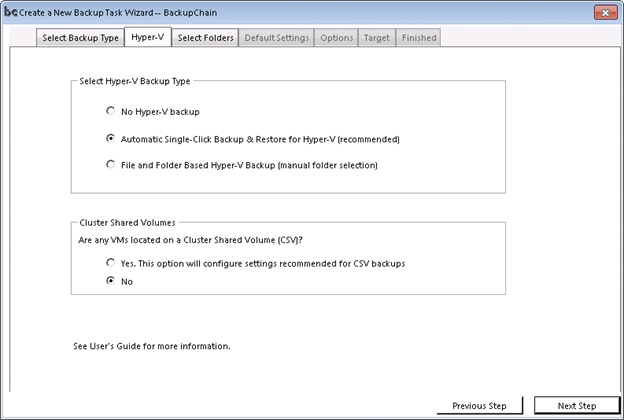
Step #2: Select Automatic Protection
Now we accept the recommended automatic settings. If a CSV is being used, you need to select it now:
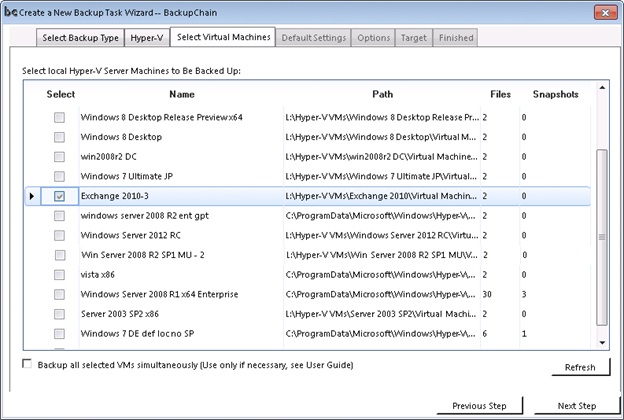
Step #3: Virtual Machine Selection
Now we select the VMs from the list. Note that on CSVs you’ll only see the ones hosted on the local node.
Step #4: Select Target Location
Finally we select a target. This can be any local folder, a network folder, or an FTP/FTPS site:
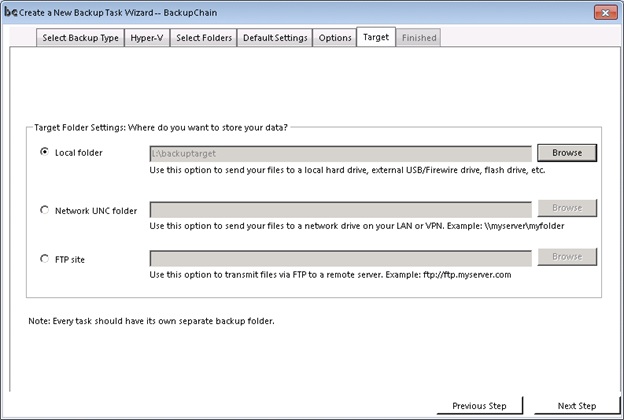
Note that with all types of targets BackupChain uses file-level deduplication to reduce backup space and processing time, even when using FTP.
Backup Software Overview
Server Backup SoftwareDownload BackupChain
Cloud Backup
Backup VMware Workstation
Backup FTP
Backup VirtualBox
Backup File Server
Hyper-V Backup
Backup Hyper-VPopular
- Hyper-V Links, Guides, Tutorials & Comparisons
- Veeam Alternative
- How to Back up Cluster Shared Volumes
- DriveMaker: Map FTP, SFTP, S3 Site to a Drive Letter (Freeware)
Resources
- Free Hyper-V Server
- Remote Desktop Services Blog
- SCDPM Blog
- SCOM Blog
- V4 Articles
- Knowledge Base
- FAQ
- Archive 2024
- Archive 2022
- Archive 2021
- Archive 2020
- Archive 2018
- Archive 2017
- Archive 2016
- Archive 2015
- Archive 2014
- Archive 2013
- Hyper-V Scripts in PowerShell
- FastNeuron
- BackupChain (Greek)
- BackupChain (Deutsch)
- BackupChain (Spanish)
- BackupChain (French)
- BackupChain (Dutch)
- BackupChain (Italian)
Backup Software List
BackupChain
Veeam
Unitrends
Symantec Backup Exec
BackupAssist
Acronis
Zetta
Altaro
Windows Server Backup
Microsoft DPM
Ahsay
CommVault
IBM
Other Backup How-To Guides
- Download Linux Integration Services 3.5 for Hyper-V
- 0x800705aa How to Fix ERROR NO SYSTEM RESOURCES
- Incremental Backup vs. Differential Backup
- What is Deduplication?
- The Pitfalls of Hyper-V Passthrough Disks and Why You Shouldn’t Use Them
- How to fix error CLSID {463948d2-035d-4d1d-9bfc-473fece07dab} Access Denied
- Hyper-V IDE or SCSI? What’s Performing Better, Faster?
- Windows Server 2012: Hotfixes for Cluster Servers
- Windows Server 2022 ISO Final Release Free Download
- How to Convert VMware ESX VM to Hyper-V
- Microsoft Hyper-V Backup for VHD and VHDX VMs
- 8 Tape Backup Disadvantages and Issues You Need To Know
- What is Hyper-V and What Operating Systems are Supported?
- Guidelines for Installing Microsoft Exchange 2013 in Hyper-V
- The Ultimate Hyper-V PowerShell Commands Cheat Sheet
- Hyper-V Virtual Networking: All You Need to Know in 2 Minutes
- 8 Pros and Cons of Hyper-V Backup using USB External Drives
- Hyper-V Best Practices You Must Know
- How to: Hyper-V Backup Strategy in 12 Simple Steps
- Hyper-V on RAID is Slow…Why?