How to Easily Move VHD / VHDX to New Server, Disk, NAS, Cloud
When using the right tools, moving a VHD or VHDX file is actually quite simple. There are four options:
- Move VHD to a New Server via the LAN network or a UNC share
- Move VHD to another disk drive
- Moving a VHDX to a NAS device for the purposes of archiving or backup
- Moving a VHDX to the Cloud
Step #1: Get the Tool
Download BackupChain and install it on your server where the original VHD files are stored.
Step #2: Create a New Task to Move VHDs Over
Now you need to set up a simple task that will move the VM data (VHD and/or VHDX) over to the other side, whether it is a cloud server, new Hyper-V server, or another disk.
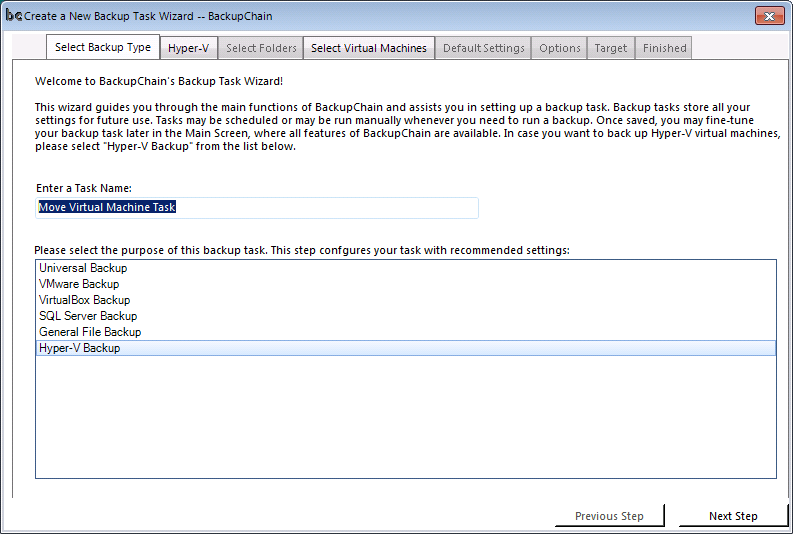
Select Hyper-V Backup and enter the task name. The task settings will remain in BackupChain; hence, the task may be repeated if necessary in the future, either manually or based on an automatic schedule:
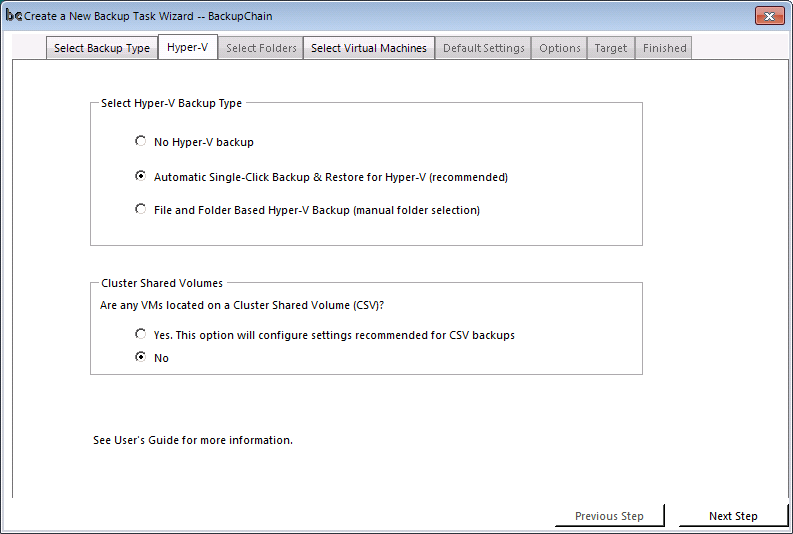
Then skip the Hyper-V Backup settings, accepting the defaults as they are:
Step #3: Select Virtual Machines to be Moved
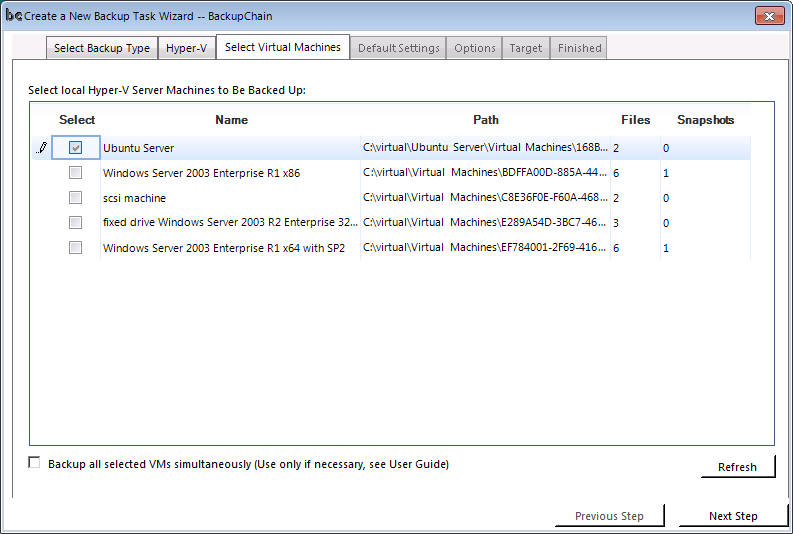
Now you simply place a check mark of the VMs you need moved. In our example, we are moving an Ubuntu Server VM VHD:
Step #4: Decide Whether You Need a Copy or a Backup
If the purpose of moving the VHD is for archiving or backup, you would now accept the default settings as shown below.
However, if you want to move the VHD over to a new server or disk for the purpose of running it there, you need “No File Processing” selected.
“No file processing” basically means that VHDs will be copied and not compressed or de-duplicated to save space.
Step #5: Select the Target
This is the step where you select the target folder or device.
If the target is a cloud server, select FTP and enter the FTP user name, password, and the address and port number of the FTP site.
If the target is another local disk, use “Local Folder” and browse to the folder.
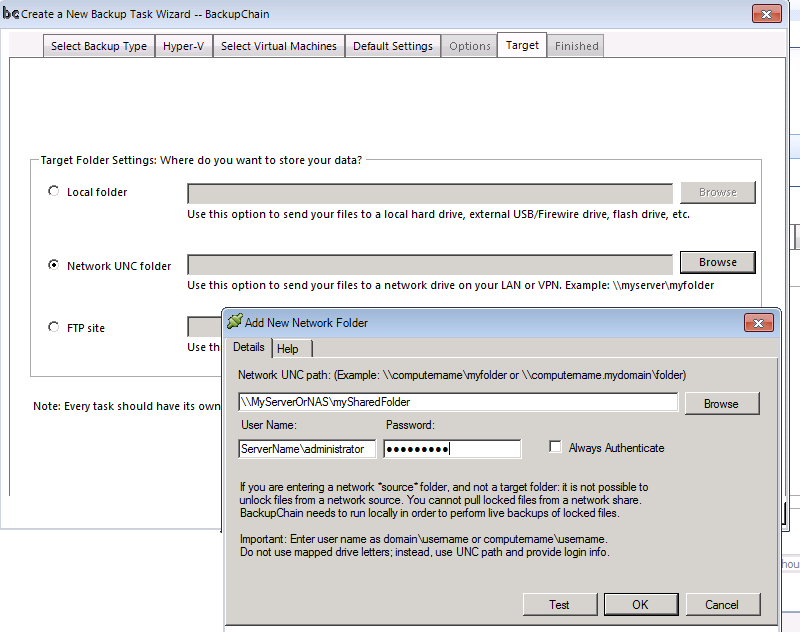
The example below shows a network target sample setting, that you would select when you want to move the VHD to a NAS device or another Hyper-V host on the LAN network.
In the latter case, you’ll need to first set up a network share on the receiving server, then enter the network details as shown below:
Very Important: To prevent authorization issues you would want to enter the user name as ServerName\UserName as shown above, or DomainName\UserName if the servers are all part of a domain.
The “Always authenticate” option is useful when the network server permits read-only access to everyone but write access is only permitted to authenticated users. If that’s how the network is configured or if you get write access errors when running the task, you’ll need to switch ‘Always Authenticate’ on.
On some larger networks with multiple domains you may need to append the domain name to the server UNC path. For example, \\MyServerOrNas\mySharedFolder would be rewritten as: \\MyServerOrNas.MyDomainName\mySharedFolder
Step #5: Run the Task
After entering the task details, click through all following screens and click ‘Start Now’ at the end and the task will start automatically.
If you need this task to be repeated again, you can use the Scheduler tab in the main screen of BackupChain to set up a schedule.
Bonus: Move And Keep Just One or More Copies
When you create a task to move the VHDs elsewhere, it is possible to keep more than one copy of each VHD.
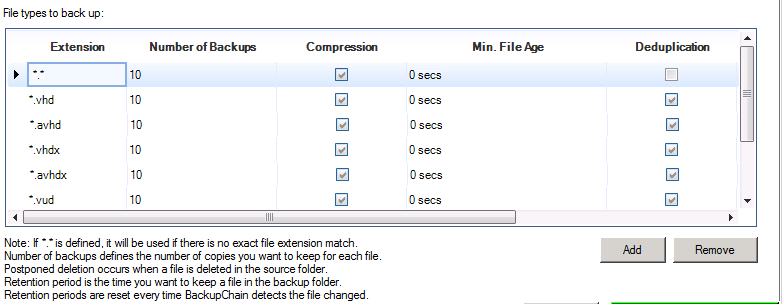
The default setting in BackupChain “Number of Backups” is 10, and it’s stored in the File Types tab:
The above table allows users to fine-tune their retention settings as necessary.
Boot VMs Instantly on Recovery Server
You could set “number of backups” to 1 and have BackupChain move each VHD over to another host and then delete the older VM copy.
This is in fact a common method used to create a backup recovery server. Many users set up their “move task” to run nightly and send the VHDX to another host.
In case of a disaster you would simply power up the VM on the recovery server without the need to go through a restore operation, as would be the case when using backups.
Tech Support
Feel free to contact BackupChain tech support if you need assistance (9-5 ET)
Backup Software Overview
BackupChain Server Backup SoftwareDownload BackupChain
Cloud Backup
Backup VMware Workstation
Backup FTP
Backup VirtualBox
Backup File Server
Hyper-V Backup
Backup Hyper-VPopular
- Hyper-V Links, Guides, Tutorials & Comparisons
- Veeam Alternative
- How to Back up Cluster Shared Volumes
- DriveMaker: Map FTP, SFTP, S3 Site to a Drive Letter (Freeware)
Resources
- Free Hyper-V Server
- Remote Desktop Services Blog
- SCDPM Blog
- SCOM Blog
- V4 Articles
- Knowledge Base
- FAQ
- Sitemap
- Backup Education
- Backup Sichern
- Hyper-V Scripts in PowerShell
- FastNeuron
- BackupChain (Greek)
- BackupChain (Deutsch)
- BackupChain (Spanish)
- BackupChain (French)
- BackupChain (Dutch)
- BackupChain (Italian)
Backup Software List
BackupChain
Veeam
Unitrends
Symantec Backup Exec
BackupAssist
Acronis
Zetta
Altaro
Windows Server Backup
Microsoft DPM
Ahsay
CommVault
IBM
Other Backup How-To Guides
- How to Open ISO in Hyper-V Server: Mount ISO to Drive
- How to Resize, Shrink, or Expand VHDX in Hyper-V
- How to Convert VHD Files to VHDX Disks in Hyper-V
- 9 Editions of Windows Server 2012 Compared At a Glance
- Avoid Saved State Backup and Check Hyper-V Integration Service Versions Automatically
- What is Hyper-V and What Operating Systems are Supported?
- Freeware Backup Software–Watch Out!
- Get All VHDX for All VMs with this PowerShell Script
- VMware Scheduled Snapshot Creation in a Task, Fully Automated
- Microsoft Hyper-V Backup for VHD and VHDX VMs
- Hyper-V Cluster 2012 R2 Setup Instructions, Simple and Quick
- Current Windows Server 2012 Updates and Hotfixes
- Move Hyper-V VM from Windows 8 to Server 2012 and Vice Versa
- 0x8004230f VSS_E_UNEXPECTED_PROVIDER_ERROR VSS snapshot creation failed
- How to Backup a Virtual Server While Running
- How to Mount a VHDX to Windows using a PowerShell Script
- How to Install a Virtual Machine Inside a Virtual Machine (Hyper-V)
- How to fix: Selected writer ‘Microsoft Hyper-V VSS Writer’ is in failed state, VSS_WS_FAILED_AT_PREPARE_SNAPSHOT
- Veeam Alternative for Hyper-V Backup
- What are Hyper-V Checkpoints, Snapshots, and VSS?


